dinsdag 29 januari 2013

Lovable


Remember, my tutorials are a guideline only, let your imagination free.
 
What do we need:
A mask : Vix_Mask232
Filter: Mura's Meister Copies
And a tube
I used 1 from Danielle Pioli
Get it at My Tubed Art


Let's begin.
 
Open the mask in your PSP.
Open Paper FM-Sweet Valentine Paper-3, make a duplicate en close the original.
Layers, new mask layer, from image.
Look up Vix_Mask232.
Layers, merge, merge group.
 
Copy FM-Sweet Valentine-Element-75 and paste as a new layer.
Resize with 40%.
Effects, Mura's Meister Copies with these settings.
 
 
Apply dropshadow.
Copy FM-Sweet Valentine Paper-9 and paste as a new layer.
Copy FM-Sweet Valentine-Element-64 and paste as a new layer.
Resize with 65%.
Get your magic wand and select everything outside your frame where you don't want to have any paper left, tolerance set to 20 .
Pay attention to the loops of the bow.
Selections expand by 2 px.
Activate the layer with paper-9 and press delete.
Selections, select none.
 
Duplicate your frame layer.
Copy your tube and paste as a new layer.
Resize if you want and apply drop shadow.
layers arrange, move down.
Erase the part of your tube which stick out of the bottom of the frame.
Give the bottom frame a dropshadow.
Activate your top frame
Erase some of the top so the head of your tube will be free.
 
 
Copy FM-Sweet Valentine-Element-72 and paste as a new layer.
Resize with 50%, apply dropshadow and move to the right.
Copy FM-Sweet Valentine-Element-71 and paste as a new layer.
Resize with 40%, apply dropshadow and place it next to the other bear.
 
Add the correct ©info, your license number and name after you have resized.
Save as JPG or export as PNG
 
©JustSan 04-Feb-2011

Easter fun


Remember, my tutorials are only a guideline.
Let your imagination free
 
Materials needed:
A scrapkit from Scraps Dimensions
called Easter Bliss
 
A tube of choice, I chose one from ©LadyMishka  @ PFD
A mask from Monti's pixel playground: Monti's blinds 1 mask
 
 
Let's begin
Open your tube & mask in PSP.
Open paper2 make a duplicate and close the Original.
Apply monti's mask, make sure invert mask is checked.
Merge group.
 

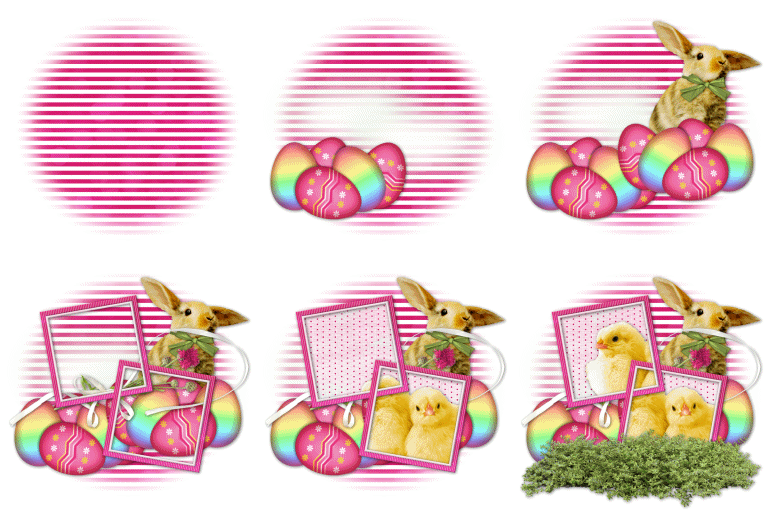
Now here is something different, instead of telling you where to put all the elements, I have made a tag-build-up animation to show you how I did mine.
The original idea for this animation comes from René Kunert aka giZZy, and I was given permission to use it in my tutorials, Thank you giZ you're the best!!
http://www.rebel-dezigns.com/
The animation starts after I have applied the mask.
 
Now crop your whole image,
add your tube and give everything a shadow you like.


Add the correct ©info, your license number and name after you have resized.
Save as JPG or export as PNG

©JustSan 17-Apr-2011
rewritten 29-Jan-2013

Destiny


Remember, my tutorials are only a guideline.
Let your imagination free


Materials needed:
A scrapkit Scraps by Jessica

A tube of choice, I chose one from ©Keith Garvey @ Garv Girls 

(I got mine at PTE, hence the PTE lic#)

A mask from WeeScottsLass : WSL_Mask 185


Let's begin
Open your tube and mask in PSP
New image 650x650 pixels transparant.
Selections, select all
Copy BD_paper1_JD and paste into selection, select/none

Layers, new mask layer, from image..select  WSL_Mask 185.
Layers, merge, merge group
Copy BD_frame3_JD and paste as a new layer.
Grab your selection tool rectangle and draw a rectange ON the frame, selections, invert.

Copy BD_paper 12_JD and paste as a new layer.
Hit DELETE.
Copy your tube ( close-up) and paste as a new layer.
move into the selection, hit DELETE
Select/none
Set the blendmode of your tube layer to *hard light*.
Layers, merge, merge down
Layers, arrange, move down.
Activate your mask layer.
Copy BD_doodle1_JD and paste as a new layer.
Add a drop shadow.

Copy BD_vintageclock_JD and paste as a new layer.
Hide your tube layer, and move the clock to the left and up, add dropshadow.
Unhide your tube layer.
Add a dropshadow to your frame.
Copy your tube and paste as a new layer.
Move it to a good spot and add drop shadow.
Layers, merge, merge visible.
Grab your crop tool and choose in your menu crop to layer opacity ( the middle icon)

Add the correct ©info, your license number and name after you have resized.

Save as JPG or export as PNG

©JustSan 15-Apr-2011
rewritten 29-Jan-2013