woensdag 18 september 2013
vrijdag 2 augustus 2013
A cowgirls passion

Remember, my tutorials are only a guideline, let your imagination free :)
Materials needed:
A scrapkit of choice, I used:
A tube of choice:
Mine is from ©Psyco Jimi @ www.mytubedart.com
An image of a horse
Mine is from Stock.xchng
A western type font:
Mine is called Western @ www.dafont.com
--------------------------------------------------------------------------------
Let's get started.
Open your tube in PSP
New image, 600x250 transparant.
Copy paper6 and paste as a new layer
Copy your horse image and paste as a new layer, I have resized mine a bit to make it fit better.
Copy your tube and paste as a new layer, move to the left.
Set the opacity of this tube layer to 50% and merge down.
Set the blendmode of the merged layer to Hard light.
Copy your tube again and paste as a new layer.
Image, mirror and move to the right, resize if needed.
Add drop shadow
Copy flowers and paste as a new layer, image mirror and move to the right, add shadow.
Copy hay and paste as a new layer, add shadow and move to the left a bit.
New layer, fill with a light color from your tube.
Select all, selections, contract by 4 and hit delete.Select/none.
New layer, fill with a dark color from your tube.
Select all, selections, contract by 2 and hit delete.Select/none.
Type your word art A Cowgirls Passion or something else you find more suitable.
Add shadow.
Add the correct copyright info(after you have resized), your license number, name and export as .PNG or save as .JPG

To make a matching avatar I cropped the image down to 146x146
-Added borders of 2 pix with light color of tube.
-Added borders of 2 pix with dark color of tube.
If your cropped the part with the tube you have to place credits on the avatar too, just artist name and license number.
And be sure to put a name on it to or just a capital letter of the name.
Done! :D
©Sandra 25-November-2012
rewritten 02-Aug-2013
woensdag 31 juli 2013
Pixelated Gestures
Remember, my tutorials are only a guideline, let your imagination free :)
Materials needed:
A tube of choice
Mine is from ©Psyco Jimi @ www.mytubedart.com
A font of choice
I used Angilla Tattoo @ www.dafont.com
Filter:
Mura's Meister ---> Copies
--------------------------------------------------------------------------------
Let's get started.
Open your tube in PSP
New image, 600x250 transparant.
Fill with a color from your tube, not too bright/light
Copy your tube and paste as a new layer.
Effects, mura's meister: copies, wallpaper rotate, default settings.
Adjust, Blur, Gaussian blur: 12
Crop merged opaque
Effects, distortion effects, pixelate.
Put width & height to 25, symmetric checked.
Effects, edge effects, enhance.
Grab your selection tool rectangle, set feathering to 50.
Start the selection 3 blocks from the left and drag to the right for 6 blocks
See image:
If you let go, the selection will be bigger because of the feathering.
Hit Delete
Select none.
Copy your tube and paste as a new layer, move to the right.
Duplicate the tube layer, image, mirror.
Move the duplicated tube 2 layers down in the layer pallete.
Set the blend mode to overlay, or any other blend mode that fits your tube/colors
Activate the top layer and add shadow to your tube.
New layer, fill with black.
Selections, select all, selection contract, 3 pixels, hit delete.
Select none.
And you are finished.
Hope you liked the tut.
Add the correct copyright info(after you have resized), your license number, name and export as .PNG or save as .JPG
©Sandra 31-July-2013
Elegant Peacock

Remember, my tutorials are only a guideline, let your imagination free :)
Materials needed:
A tube of choice:
Mine is from ©Amberly Berendson @ www.mytubedart.com
A font of choice:
I used Respective available @ www.dafont.com
Filter:
Graphic Plus ---> Cross Shadow
--------------------------------------------------------------------------------
Let's get started.
Open up your tube in PSP.
New image: 600x250 pixels, transparant.
Pick 2 colors from your tube and make a gradient fill

Select all, modify, contract 45 pixels
Selections, modify, select selection borders:
both sides, width 2, anti-alias checked.
New layer
Fill with solid color.(1 of the colors you picked before)
Select none.
Apply inner bevel, default settings or use your own
Select inside of the frame, selections expand with 1 pixel.
Activate bottom layer
Copy your tube paste as new layer
Position to the left in the frame, layer opacity 60%
Duplicate layer, move to center in the frame, opacity 80%
Duplicate layer, move to the right side in the frame, opacity 100%
Merge the 3 tube layers together, selections invert, hit delete.
Keep selection running.
Activate bottom layer, selection, promote to layer.
Select none.
Effects, graphic plus, cross shadow, default settings.
Activate tube layer, set blend mode to screen, or any other blend mode that fits your tag.
Activate border layer, give a drop shadow.
Copy your tube and paste as a new layer.
Image, mirror.
Place it on the left
Add drop shadow
New layer
Fill with same color as used with the border.
Select all, contract by 2, hit Delete
Select none.
Use same inner bevel as before, add shadow
Crop merged opaque
And finished :)
Hope you liked the tut.
Add the correct copyright info(after you have resized), your license number, name and export as .PNG or save as .JPG
©Sandra 31-July-2013
zaterdag 8 juni 2013
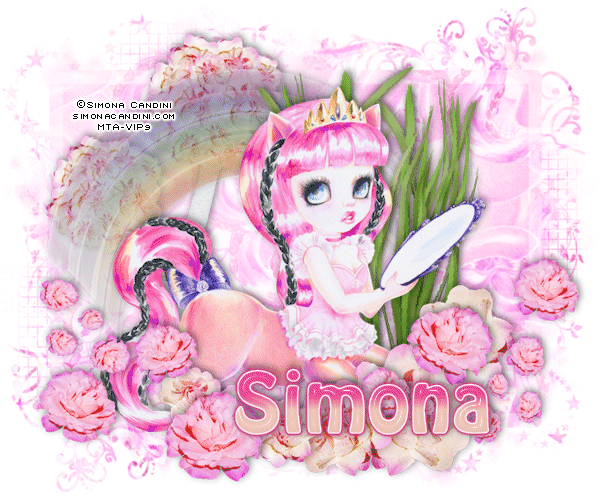
Vanity
Remember, my tutorials are only a guideline, let your imagination free :)
Materials needed:
A scrapkit of choice, I used: Lil Bo Beepers from Wicked Princess scraps
The link is down but you can download directly from her 4-shared folder
It is on page 8
A tube of choice, I used one from: ©Simona Candini @ www.mytubedart.com
A mask of choice, I used a mask from Zuzzanna: Mask8
A filter: Mura's Meister Copies
And (optional) animation shop

Let's get started.
Open your tube in PSP
New image, 750x600 white. ( you can resize later I like to work big)
Select all, new layer
Copy paper6 and paste into selection.
Select none.
Copy your tube and paste as a new layer
Mura's Meister copies: Wallpaper rotate, default settings.
Set blend mode to screen en merge layers visible.
Apply mask8 from Zuzzanna, merge group.
Now add your elements of choice.
I used:
WP_LBP_ROSETREE
WP_LBP_RAINBOW
WP_LBP_TALLGRASS
WP_LBP_ROSESWAG
WP_LBP_ROSECLUSTER2
Add your tube and give everything a dropshadow you like.
Hide the white layer in the layer palette
Crop image merged opaque.
Unhide the white layer
Now first resize before you add the correct copyright & license info.
I resized mine to 600 width.
You are done! But.......
If you want to animate the grass, copy it from your tag and paste as a new animation in
Animation shop.
Effects: insert image effect
Choose underwater.


Remove the first frame of your animation.
Select all.
Now go back to PSP.
Make all layers above the grass layer invisible.
Activate the background layer and merge visible.
Make this layer invisible and the others visible again
Now merge the visible layers so you end up with 2 layers.
Copy the bottom layer and paste into animationshop as a new animation,
Duplicate this frame as many times as you have frames of your grass layer.
In my case I have 9 frames.
Copy and paste the grass animation into selected frame, ( make sure you have selcted all
frames)
Go back to PSP, copy your upper layer, paste as a new animation in animation shop.
Copy ( make sure you have propogate paste on in AS) and paste into selected frame
And Voila all finished
I hope you enjoyed the tutorial
©JustSan 8-Jun-2013
maandag 15 april 2013
Beauty and the Beast

Remember, my tutorials are a guideline only, let your imagination free.
Materials needed:
A scrapkit from A space between
Called Backyard friends
A tube or image of choice
I chose one from ©Simona Candini @ www.mytubedart.com
Let's begin
The scrapkit is really large so we have to resize a lot.
Sharpen when you feel it is needed.
I started big with a new image 800x800
Copy element26, paste as a new layer.
Resize 35%, Resize 60%
Copy element5, paste as a new layer.
Resize 35%, Resize 60%
Copy element4, paste as a new layer.
Resize 25%, Resize 60%
Move to the right bottom of the frame.
Layers duplicate, mirror.
Merge these 2 layers, move this layer behind the frame layer.
Keep this layer active.
Copy element3, paste as a new layer.
Resize 35%
Move a little to the right.
Duplicate this layer, mirror and merge these 2 layers.
Activate the frame layer.
Copy element15 and paste as a new layer.
Resize 35%, resize 60%.
Move to the bottom left corner of the frame.
Layers duplicate, image mirror, merge these 2 layers together.
Copy element38 and paste as a new layer.
Resize 35% and again 35%.
Move a little to the left ( see my tag for positioning )
Copy element9 and paste as a new layer.
Resize 35% and again 35% and then again with 60%
Move to the bottom left corner of the frame.
Layers duplicate, image mirror.
Merge these 2 layers.
Copy element36 and paste as a new layer.
Resize 35% and again with 35%.
Move it into the middle of the red roses.
Copy element8 and paste as a new layer.
Resize 35%, again with 35% and 60%.
Move it to the middle of the red roses but move it a bit more down
( see my tag for positioning )
Now it's time to add your image/photo, you can use a tube too, choose a paper instead and then add your tube.
Activate the frame layer.
Select the inside of the frame with your magic wand,
selections expand 8 pixels.
Make a new layer beneath your frame layer.
Copy your image and paste into selection**
**Be careful when pasting images or photos into selection, they may get deformed or stretched
and it doesn't look very pretty.
This image I used is deformed slightly but it still looks ok.
If your photo or image doesn't fit that frame you just paste your image/photo as a new layer underneath the frame layer, selections invert and hit delete.
Give everything a dropshadow you like, Crop your image merged opaque,
Add the correct ©info, your license number and name after you have resized
Save as JPG or export as PNG
Below is another example with a photo from
©Chelle Photography @ www.mytubedart.com

©JustSan 15-Apr-2013
dinsdag 2 april 2013
Dandelion elf

Remember, my tutorials are a guideline only, let your imagination free.
Materials needed:
A scrapkit from Cindy's Creative Designs
Called Lil Danea Fairy
A mask from me, click for bigger size and save as .jpg

A tube of choice
I chose one from ©Judy Mastrangelo @ ADI
(I got mine at PTE)
Let's begin
Open your tube and mask in PSP
New image 600*600 transparant
Select all
Copy paper7 and paste into selection
Select none.
Apply the mask
Merge group
Now here is something different, instead of telling you where to put all the elements I have made a tag-build-up animation to show you how I did mine.
The original idea for this animation comes from René Kunert aka giZZy, and I was given permission to use it in my tutorials, Thank you giZ you're the best!!
http://www.rebel-dezigns.com/
The animation starts after I have applied the mask.

Crop your whole image, add your tube, give everything a dropshadow.
Add the correct ©info, your license number and name after you have resized
Save as JPG or export as PNG
©JustSan 02-Apr-2013
zondag 3 maart 2013
Cute Monkey

Remember, my tutorials are a guideline only, let your imagination free.
Materials needed:
A scrapkit from JustSan
Called Dotty Delicious
A template from JustSan, Template 11
A mask from Weescotslass, Mask 126
A tube of choice
I chose one from ©Coriander Shae @ www.mytubedart.com

Let's begin
Open your tube , template and mask in PSP
Duplicate the template SHIFT+D, close the original.
Activate the template.
Delete layers 01 and info.
I recolored layers 03-05 & 07 to match my tube.
Then I applied an inner bevel on all 3 layers:

Activate layer 02.
Selections, select all, float, defloat, selections invert.
Copy paper06, paste as a new layer, hit Delete,select none.
Activate layer 04.
Selections, select all, float, defloat, selections invert.
Copy paper04, paste as a new layer, hit Delete,select none.
Activate layer 06.
Selections, select all, float, defloat, selections invert.
Copy paper02, paste as a new layer, hit Delete,select none.
Activate the background layer.
Add a new layer.
Selections, select all.
Copy paper10 and paste into selection.Select none.
Apply the mask, and merge group.
Now add some elements.
I used: Element07, 35 & 39
Activate the layer above layer02.
Selections, select all, float, defloat, selections invert.
Copy and paste your tube as a new layer.Move it up so you can see the face in the selection.
Hit Delete, select none. I have set the blend mode of the tube layer to Lighter.
Activate the layer above layer06.
Selections, select all, float, defloat, selections invert.
Copy and paste your tube as a new layer.Move a part into one of the squares.
Hit Delete, select none.
Duplicate 2 times and put the other parts into the other squares.
Merge the 3 tube layers, I have set the blendmode to overlay.
If you are happy with the result you can delete the original layers.
Crop your whole image, add your tube, give everything a dropshadow.
Add the correct ©info, your license number and name after you have resized
Save as JPG or export as PNG
©JustSan 03-Mrt-2013
vrijdag 1 maart 2013
Just My Type

Remember, my tutorials are a guideline only, let your imagination free.
Materials needed:
A scrapkit from Everyday Mom Ideas
Called Just My Type
My template JS-template56 HERE
A tube of choice
I chose one from ©Danielle Pioli @ www.mytubedart.com

Let's begin
Open your tube and template in PSP
Duplicate the template (SHIFT+D) and close the original.
Delete layers: info, 03 & 10
So the kit is full sized so you need to resize a lot.
For starters I opened paper 01, 05, 06 & 14
Resized them all by 18%
Activate layer01, selections, select all, float, defloat, selections invert.
Copy paper 01, paste as a new layer and press DELETE, select none.
Do the same with layer 04, I've used paper 05
Do the same with layer 06, I've used paper 06
Do the same with layer 08, I've used paper 14.
If you are happy you can delete the original layers.
I am not happy with the black borders, so I recolored them to white,
Activate layer 02, Adjust, brightness & Contrast and set brightness all the way to 255.
Repeat this step for layer 05, 07 & 09
This is what my template looks like now:

I added some elements to the template
Resize and rotate them just the way you want....
I have used:
-50's love song music
-hearts a float
-bottle cap 50's 04
-lip print 02
-type writer luv
Crop your whole image, add your tube, apply dropshadow to everything you want.
Add the correct ©info, your license number and name after you have resized
Save as JPG or export as PNG
©JustSan 01-Mrt-2013
woensdag 27 februari 2013
Irish Luck

Remember, my tutorials are a guideline only, let your imagination free.
Materials needed:
A scrapkit from Dnscraps
Called Journey Throught the lot
A mask from me :)
Click to enlarge, save as jpg

A tube of choice
I chose one from ©Barbara Jensen @ SATC
Animationshop(optional)
And an animation (optional)
Mine comes from @ Scrappy bit of fun
I chose Simona ani 315

Let's begin
Open your tube and mask in PSP
New image 600x600 white bg
New layer
Select all
Copy paper11 and paste into selection
Select none.
Apply the mask
Merge group
Now here is something different, instead of telling you where to put all the elements I have made a tag-build-up animation to show you how I did mine.
The original idea for this animation comes from René Kunert aka giZZy, and I was given permission to use it in my tutorials, Thank you giZ you're the best!!
http://www.rebel-dezigns.com/
The animation starts after I have applied the mask.

Crop your whole image, add your tube, give everything a dropshadow.
Add the correct ©info, your license number and name after you have resized
If you don't want to animate : Save as .jpg or export as .png
For adding the animation I did the following:
I merged the 5 bottom layers of my tag
preview

Copy and paste it to animation shop as a new animation.
Open the animation you like to use.
Mine has 35 frames, that is a lot so I culled the animation.
Activate the animation, edit select all.
Animation, cull animation.
Remove 1 frame every 2 frames, so I ended up with 18 frames.
Activate your tag, duplicate the image (CTRL+C, CTRL+L) untill you have 18 frames.
Edit select all.
Go back to your animation.
Copy and paste into selected frame(first frame of your tag)
Preview your animation to make sure you like it :)
Go back to PSP.
Hide the merged layer, activate the top layer and merge visible.
Copy and paste this into animationshop as a new animation.
Now make sure propogate paste is on (edit, propogate paste)
Copy, right click into your first frame of your animation and paste into selected frame.
Save as .gif
©JustSan 27-Feb-2013
maandag 18 februari 2013
Lost Angel

Remember, my tutorials are a guideline only, let your imagination free.
Materials needed:
A scrapkit from Wicked Princess Scraps
Called Dark Angel
A tube of choice
I chose one from ©Chris Down @ MTA
Let's begin
Open your tube in PSP
New image 600x600 Transparant
Now here is something different, instead of telling you where to put all the elements I have made a tag-build-up animation to show you how I did mine.
The original idea for this animation comes from René Kunert aka giZZy, and I was given permission to use it in my tutorials, Thank you giZ you're the best!!
http://www.rebel-dezigns.com/
The animation starts after I copy and pasted WP_DA_GATE

Crop your whole image, add your tube, give everything a dropshadow.
You can also crop opaque merged aftwards(after the drop shadow applied) to remove the extra canvas.
Add the correct ©info, your license number and name after you have resized
Save as JPG or export as PNG
©JustSan 18-Feb-2013
zondag 3 februari 2013
Valencia

Remember, my tutorials are a guideline only, let your imagination free.
Materials needed:
A scrapkit from A space between
Called Valencia
A mask from Kadoodled by Kaci
I chose KBH_2013_mask 7
A tube of choice
I chose one from ©Terra Bidlespacher @ MTA

Let's begin
Open your tube and mask in PSP
New image 750x600 tranparant
Select all
Copy paper7 and paste into selection
Select none.
Apply the mask
Merge group
Now here is something different, instead of telling you where to put all the elements I have made a tag-build-up animation to show you how I did mine.
The original idea for this animation comes from René Kunert aka giZZy, and I was given permission to use it in my tutorials, Thank you giZ you're the best!!
The animation starts after I have applied the mask.

Crop your whole image, add your tube, give everything a dropshadow.
Add the correct ©info, your license number and name after you have resized
Save as JPG or export as PNG
©JustSan 03-Jan-2013
vrijdag 1 februari 2013
Cupcake Love

Remember, my tutorials are a guideline only, let your imagination free.
Materials needed:
A scrapkit from Alika's scraps called Loves Kiss
A mask from weescotslass #99
A tube of choice
Mine is from ©JustSan @ MTA
Let's begin
Open your tube and mask in psp.
New image, 600x600 transparant.
Select all
Copy paper8 and paste into selection.
Select none.
Apply the mask and merge group.
Now here is something different, instead of telling you where to put all the elements I have made a tag-build-up animation to show you how I did mine.
The original idea for this animation comes from René Kunert aka giZZy, and I was given permission to use it in my tutorials, Thank you giZ you're the best!!
http://www.rebel-dezigns.com/
The animation starts after I have applied the mask.
The original idea for this animation comes from René Kunert aka giZZy, and I was given permission to use it in my tutorials, Thank you giZ you're the best!!
http://www.rebel-dezigns.com/
The animation starts after I have applied the mask.

Crop your whole image, add your tube, give everything a dropshadow.
Add the correct ©info, your license number and name after you have resized
Save as JPG or export as PNG
Add the correct ©info, your license number and name after you have resized
Save as JPG or export as PNG
©JustSan 17-Aug-2012
donderdag 31 januari 2013
Love Angel

Remember, my tutorials are a guideline only, let your imagination free.
Let's begin
Open your tube and mask in PSP
New image 600x600 transparant
Select all
Copy paper2 and paste into selection
Select none.
Apply the mask
Merge group
Open your tube and mask in PSP
New image 600x600 transparant
Select all
Copy paper2 and paste into selection
Select none.
Apply the mask
Merge group
Now here is something different, instead of telling you where to put all the elements I have made a tag-build-up animation to show you how I did mine.
The original idea for this animation comes from René Kunert aka giZZy, and I was given permission to use it in my tutorials, Thank you giZ you're the best!!
http://www.rebel-dezigns.com/
The animation starts after I have applied the mask.
The original idea for this animation comes from René Kunert aka giZZy, and I was given permission to use it in my tutorials, Thank you giZ you're the best!!
http://www.rebel-dezigns.com/
The animation starts after I have applied the mask.

Crop your whole image, add your tube, give everything a dropshadow.
Add the correct ©info, your license number and name after you have resized
Save as JPG or export as PNG
Add the correct ©info, your license number and name after you have resized
Save as JPG or export as PNG
©JustSan 31-Jan-2013
Sweet Love

Remember, my tutorials are a guideline only, let your imagination free.
Materials needed:
A scrapkit from Wicked Princess Scraps
Called Heart Felt rose
A mask from me, JS_masker2020v
A scrapkit from Wicked Princess Scraps
Called Heart Felt rose
A mask from me, JS_masker2020v
Click for full size then save as jpg

Let's begin
Open your tube and mask in PSP
New image
Select all
Copy paper11 and paste into selection
Select none.
Apply the mask
Merge group
Now here is something different, instead of telling you where to put all the elements I have made a tag-build-up animation to show you how I did mine.
The original idea for this animation comes from René Kunert aka giZZy, and I was given permission to use it in my tutorials, Thank you giZ you're the best!!
http://www.rebel-dezigns.com/
The animation starts after I have applied the mask.
The original idea for this animation comes from René Kunert aka giZZy, and I was given permission to use it in my tutorials, Thank you giZ you're the best!!
http://www.rebel-dezigns.com/
The animation starts after I have applied the mask.

Crop your whole image, add your tube, give everything a dropshadow.
Add the correct ©info, your license number and name after you have resized
Save as JPG or export as PNG
Add the correct ©info, your license number and name after you have resized
Save as JPG or export as PNG
©JustSan 31-Jan-2013
woensdag 30 januari 2013
Red Sweet Sexy

Remember, my tutorials are a guideline only, let your imagination free.
Materials needed:
A scrapkit from Kadoodled by Kaci
Called Serendipity
A mask from WeescotsLass, mask 220
A tube of choice
I chose one from ©Ismael Rac @ Xeracx
A scrapkit from Kadoodled by Kaci
Called Serendipity
A mask from WeescotsLass, mask 220
A tube of choice
I chose one from ©Ismael Rac @ Xeracx
Let's begin
Open your tube and mask in PSP
New image 600*600 transparant
Select all
Copy paper14 and paste into selection
Select none.
Apply the mask
Merge group
Open your tube and mask in PSP
New image 600*600 transparant
Select all
Copy paper14 and paste into selection
Select none.
Apply the mask
Merge group
Now here is something different, instead of telling you where to put all the elements I have made a tag-build-up animation to show you how I did mine.
The original idea for this animation comes from René Kunert aka giZZy, and I was given permission to use it in my tutorials, Thank you giZ you're the best!!
http://www.rebel-dezigns.com/
The animation starts after I have applied the mask.
The original idea for this animation comes from René Kunert aka giZZy, and I was given permission to use it in my tutorials, Thank you giZ you're the best!!
http://www.rebel-dezigns.com/
The animation starts after I have applied the mask.

Crop your whole image, add your tube, give everything a dropshadow.
Add the correct ©info, your license number and name after you have resized
Save as JPG or export as PNG
Add the correct ©info, your license number and name after you have resized
Save as JPG or export as PNG
©JustSan 06-Jun-2012
Spring Cleaning

Remember, my tutorials are a guideline only, let your imagination free.
Materials needed:
A scrapkit from Fantasy Moments
Called Happy Moments
A mask from myself, grab it HERE
A tube of choice
I chose one from ©Ismael Rac @ Xeracx
A scrapkit from Fantasy Moments
Called Happy Moments
A mask from myself, grab it HERE
A tube of choice
I chose one from ©Ismael Rac @ Xeracx
Let's begin
Open your tube and mask in PSP
New image 600x600 transparant
Select all
Copy paper4 and paste into selection
Select none.
Apply the mask
Merge group
Open your tube and mask in PSP
New image 600x600 transparant
Select all
Copy paper4 and paste into selection
Select none.
Apply the mask
Merge group
Now here is something different, instead of telling you where to put all the elements I have made a tag-build-up animation to show you how I did mine.
The original idea for this animation comes from René Kunert aka giZZy, and I was given permission to use it in my tutorials, Thank you giZ you're the best!!
http://www.rebel-dezigns.com/
The animation starts after I have applied the mask.
The original idea for this animation comes from René Kunert aka giZZy, and I was given permission to use it in my tutorials, Thank you giZ you're the best!!
http://www.rebel-dezigns.com/
The animation starts after I have applied the mask.

Add your tube, give everything a dropshadow.
Add the correct ©info, your license number and name after you have resized
Add the correct ©info, your license number and name after you have resized
©JustSan 9-Jul-2011
rewritten 30-Jan-2013
Just Peachie

Remember, my tutorials are a guideline only, let your imagination free
Materials needed:
A scrapkit from Cinnamonscraps
Called Peachie
A mask from weescottslass, Mask276
Mura's meister Copies
A tube of choice
I chose one from ©Elias Chatzoudis @ Elias artshop
(I got mine at PTE)
Let's begin
Open your tube and mask in PSP
New image 600x600
Copy paper 2 and paste into selection
Select none.
Apply the mask, merge group
Copy frame3 and paste as a new layer.
Select the inside with your magic wand.
Expand selection by 4, selections invert.
Copy paper1 and paste as a new layer.
Hit DELETE. Select none
Move this layer behind your frame layer.
Grab your txt tool and type the words Peachie.
Covert to rasterlayer.(I Always have my settings set to vector so if you don't, you don't have to convert it, just make sure it is on a seperate layer)
Mura's meister copies: Tiling, standard setting.
Image rotate 35° to the left
Activate your frame layer, click inside with your magic wand,
selections expand by 4, selections invert.
Activate the txt layer and hit DELETE
Select none.
Set the blend mode of the tekst to soft light.
Add a dropshadow to your frame.
Copy frame 4 and paste as a new layer.
Resize by 75%
With your lasso selection tool, click on the frame until you have it selected
Selections invert.
Copy paper 3 and paste as a new layer.
Hit DELETE.
Do not deselect yet.
Copy your tube and paste as a new layer
Move the face into one of the frames.
Hit DELETE.
Select none.
Activate your frame 4 layer and move it up twice.
Crop your whole image ( set it to 600x600 )
Activate your tube layer and duplicate.
On the top one apply a gaussian blur of 3
Colorize it: Hue 13, saturation 50
Set the blendmode to overlay
Set the blend mode of the bottom tube layer to screen.
Activate the frame 4 layer and add dropshadow.
Copy bow 3 and paste as a new layer
Resize 2x75% and put into place
Add shadow
Copy bow 10 and paste as a new layer
Resize 2x75% and put into place
Add shadow
Copy Jewel1 and paste as a new layer
Resize 2x75% and put into place
Add shadow
Add your tube and give shadow.
Add the correct ©info, license number and your name after you have resized.
©JustSan 22-Apr-2011
rewritten 30-Jan-2013
Abonneren op:
Posts (Atom)